Beginner friendly foolproof Khandvi recipe
A step by step khandvi recipe for no fail Khandvi rolls each time.
Equipment
- 1 thick bottom kadhai
Ingredients
khandvi batter
- 1/4 cup Chickpea flour
- 1/4 cup Thick sour yogurt
- 1/2 cup Water
- 1 tsp Ginger chilli paste
- 1 pinch Asafoetida
- 1/4 tsp Sugar
- 1/4 tsp turmeric powder
- Salt to taste
Tadka
- 2 tbsp Peanut oil
- 1/2 tsp Mustard seeds
- 1 tsp Sesame seeds
- 1 pinch Asafoetida
- 8 leaves Curry leaves
- 2 nos Green chillies Diced
Garnish
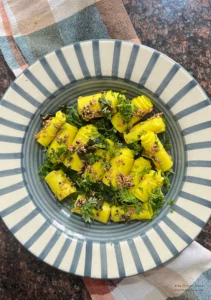
- 2 tbsp Fresh coriander leaves Chopped
Instructions
Khandvi batter cooking
- Assemble all the required ingredients and vessels. Pre-prep is paramount.
- Grease the backside of a big thali/tray/countertop. If using thali/tray and you have more batter you can grease the inside side too. (Ensure you grease very lightly or no greasing once you are confident.)
- In a bowl mix together the mentioned besan, sour yogurt, asafoetida, turmeric, salt, sugar, ginger-chilli paste.
- Add the mentioned amount of water to make a runny batter.
- Pass the batter through a sieve directly into the kadhai to be used for cooking. Ensure that you press against the sieve using a spoon/spatula to extract maximum flavour out of the ginger-chilli fibers. (The batter would be pale yellow)
- Place the kadhai on the stove at a medium low flame. Stirring gently and continuously. If using a nonstick kadhai ensure you use only nonstick friendly spatulas-wood, silicon, nylon preferably.
- Once the batter starts thickening, consistency like custard, the batter behind spatula leaves light grooves while stirring, immediately lower the flame to its lowest setting and do not leave the batter for even a second and continuously stir. (It would still be matte but slightly deepened in color)My timeline -2 minutes into the cooking process
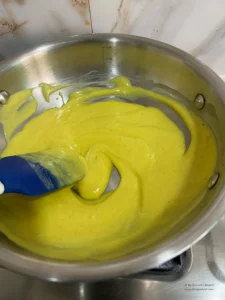
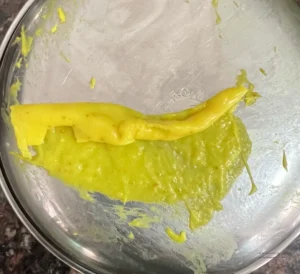
- The mixture will continue thickening, the spatula leaving trail through which kadhai is visible that stay 1-2 seconds. Do the peel test-smear a spoonful of batter on a small ungreased plate wait for 45 seconds and try to peel. If it smudges, sticks, peels unevenly it needs more cooking. and it will.
- While the batter is cooling keep on continuously stirring the batter in the kadhai My time line- 7 minutes into the cooking process
- When the batter is ready it will show certain signs 1. It will start collecting in the center in one mass when you move the spatula round the kadhai. But not stiff like dough but more like a paste.2. It will leave a clean cleaved batter that merges after 3-4 seconds. if it doesn't merge it has become overcooked doughy and wouldn't form rolls.3. The batter would look glossy. Its edges would be lightly translucent. 4. Bubbles would try to spurt out. 5. A very fine film of the cooked batter would be visible underneath your cooked batter (like choux pastry)- The starch has gelatinized.6. When lifting spatula the batter would completely cling and on light flicking fall in a heavy plop leaving a v shape of the batter hanging behind on the spatula. 7. Peel test would be successful. (Most important). The peel test signifies sure doneness. you must immediately move forward. Do the final peel test immediately when you see above signs.My timeline - 12 minutes into the cooking process.
- If scaling the recipe and using thalis keep the batter covered. While using underside of thali use it first than use the backside.
- Immediately divide the batter in two. Pour one portion on one plate-a little offset from center. Keep the rest covered. Quickly spread the mixture on the greased plate into a thin sheet.
- Repeat quickly with the remaining batter and thali.
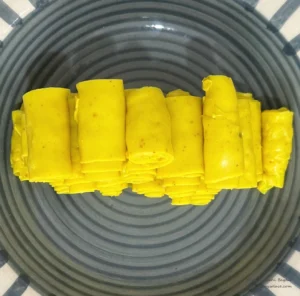
- Let the batter cool for 5 minutes. Score into 1 inch wide strips using a knife and roll.
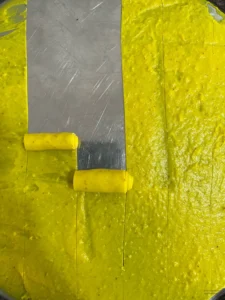
- If you wish you may sprinkle grated fresh coconut, chopped green coriander before rolling to make stuffed khandvi. You may also apply a horizontal cut cutting the strips in half in order to make khandvi with less layers.
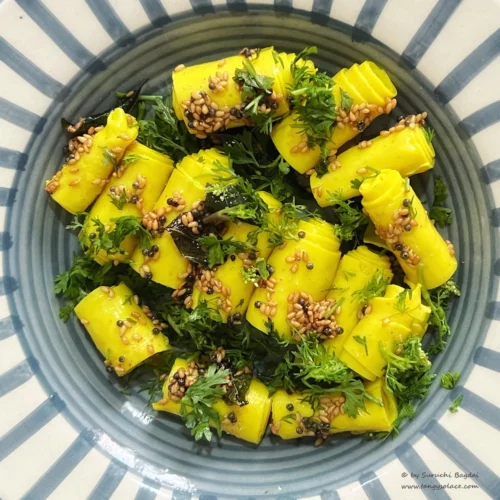
- Arrange all this pieces on a serving platter.
Tadka
- In a hot tadka pan pour oil let it heat on medium flame till shimmering.
- Add mustard seeds, asafoetida, curry leaves, and green chillies roughly diced (if you like some extra spice)
- Pour this tadka over the khandvi rolls and serve.
Notes
- Read the recipe as many times as needed before attempting as the batter transitions fast and goes from a matter of cooked to overcooked within a minute i.e in seconds.
- The timeline I mentioned is personal your timeline would depend on the size and density of your pan, your flame size, the quantity of water in your batter.
- The above detailed step by step recipe is written in order to eventually make you recipe free in making khandvi.
- If your batter forms lump try and break them quickly and as much as possible-use back of spoon, whisk, straining whatever works. A lumpy batter won't allow you to spread a smooth khandvi sheet. If you get lumps stuck to the sides of the kadhai towards the end leave them be and pull the remaining pasty batter on the thali.